全文约1.7万字,请适当品尝。
最近把很多事情都搁置了,专心搞了一下网站,主要就是在于对主题模板的修改。原本打算花钱买一个博客主题,但是看了看那些付费主题的价格,还是将我劝退。于是就开始着手自己折腾主题样式。
其实以前也折腾过,但也只不过是很轻微的修改,而这次,我花了近半个月的时间,认真修改成一个目前还算满意的主题样式,之后就开始好好创作。
因为本文涉及建网站,就免不了谈一些计算机语言,比如html、PHP、CSS等,或许对大多数非专业人士看起来很头痛,但我要告诉各位,我也并非专业人士,我也没有进行过相应的代码学习。但我之所以能够看得懂一些,并且能自行修改,靠得仅仅是我们上学以及平时学过的一些东西。
比如英语,如果你英语比较好,那么对于大多数计算机语言就能够有很直接的理解,如果英语不好,看到程序中的一个词,如content(内容),你不知道它的意思,那么就更不要说理解程序所表达的意思。当然还有一种情况,在计算机语言中也会有很多将英文缩写的,比如<p>这个标签,如果你第一次看到它,你一定不知道什么意思,但如果你了解之后,这个<p>就是一个缩写,它的原形是paragraph,如果你英语还可以,那么你就明白它是“段落”的意思,这个标签里的所有内容就是一段。
比如数学,if-else条件语句就是高中数学必学的内容,同样也应用到的编程中,这东西看起来其实并没那么难,我们只要找到程序语言中的if、else,就能明白这是一句条件判定语句。
再比如我们工作和日常生活中会用到的一些东西,像字体大小用px、em、rem,它们之间的区别是在适配不同设备显示出的字体大小,比如以px为单位的字体大小,仅能适配部分浏览器和少部分手机设备,其实我们使用的大部分文档软件,里边的字号就是px单位的。另外如果你对excel比较熟练的话,那么里边的很多函数你也会在编程中遇到。
其实总的来看,你会发现,编程这个东西就是东拼西凑而来的,各个领域都能涉及,只要用心一点,并不难。
好了,废话就不多说了,接下来就将我这次修改twentytwelve子主题的过程记录一下。
注:文中提到的修改,部分是网友的智慧,部分是我根据自己的理解做出的修改。
创建子主题并链接父主题
先解释下什么是父主题和子主题。
所谓父主题,就是你在搭建网站时所选用的主题模板,比如我所使用的twenty twelve主题,那么网站就是根据这个主题的设置展示。
所谓子主题,就是父主题的延伸,父与子的关系,通过子主题可以修改、添加、覆盖父主题的一些样式。子主题存在的意义在于,当你通过子主题修改网站的样式,不会因为父主题的更新,而失去之前的修改。一般情况下,我们会将子主题命名为xxxx-child,如twenty twelve的子主题名就是twenty twelve child。
那么如何创建子主题呢?
首先,你要建立一个文件夹,可以命名为xxxx-child(就是在父主题名的基础上添加child),这个文件夹建议和父主题文件夹同级,方便操作。
接下来就是链接子主题和父主题,因为你要在父主题的基础上优先展示子主题样式,那么就不得不将它们链接在一起。有三个重要的文件:
- style.css——样式表
- functions.php——函数模板
- screenshot.jpg——子主题缩略图
首先是样式表style.css,在这个样式表中,你需要在开头添加以下说明内容:
/*
Theme Name: Twenty Twelve-child
Theme URI: /
Description: Xie二次开发twentytwelve子主题
Author: Xie
Author URI: /
Template:twentytwelve
Version: 1.1.0
*/
这个不难理解,就是告诉程序,它就是twentytwelve主题的子主题,这段内容中,最重要的部分就是Template,后边的内容一定要和父主题的文件夹名一样,不然子主题将无法正常工作,其余部分你就可以改成自己的内容。
接下来便是调用子主题,需要用到functions.php,这里插一句,过去在调用子主题,一般是在子主题的style.css的说明内容下添加一句:
@import url("../twentytwelve/style.css");但现在不太建议这样去做,具体原因我不清楚。
如今的做法是,在functions.php开头添加以下内容:
<?php/* Function to enqueue stylesheet from parent theme */function child_enqueue__parent_scripts() {wp_enqueue_style( 'parent', get_template_directory_uri().'/style.css' );}add_action( 'wp_enqueue_scripts', 'child_enqueue__parent_scripts');或是:
<?php
add_action( 'wp_enqueue_scripts', 'twentytwelve_enqueue_styles' );
function twentytwelve_enqueue_styles() {

    $parent_style = 'parent-style'; // This is 'twentytwelve-style' for the Twenty Twelve theme.

    wp_enqueue_style( $parent_style, get_template_directory_uri() . '/style.css' );
    wp_enqueue_style( 'child-style',
        get_stylesheet_directory_uri() . '/style.css',
array( $parent_style ),
        wp_get_theme()->get('Version')
    );
}
以上两种方法经过我的测试,都可用,具体用哪个,你可以根据自己的喜好选择。这段内容的意思就是告诉程序,我创建了子主题并且引用子主题的样式。切记,functions.php在内容的最开始一定有'<?php’这个函数头,这代表开始,如果不存在这个函数头,这个文件将没用。
再就是screenshot.jpg,子主题的缩略图,可以自己制作一个,就像我这篇文章题图的那样,建议尺寸是880×660。
将这个包含这三个文件的子主题文件上传到wordpress后台,在主题选项里,你就可以看到这个子主题了,点击启用即可。记住,千万不要删掉父主题哦,不然你的子主题也没用。
除了上面说的三个文件,其他还要修改什么,就从父主题文件夹里复制到子主题修改即可,比如你要修改网站页脚内容,就把footer.php文件复制到子主题,然后修改子主题footer.php的内容即可。这也是子主题比较便利的优点。
网站整体字体设置以及禁用谷歌字体
用wordpress新搭建的网站,是存在Google font的,但在国内,这种字体加载很慢甚至不能加载,严重拖累了网站的打开速度,那么我们就要禁用它,方式就是在functions.php内添加这样一段代码:
//禁用谷歌字体
function mytheme_dequeue_fonts() {
wp_dequeue_style( 'twentytwelve-fonts' );
}
add_action( 'wp_enqueue_scripts', 'mytheme_dequeue_fonts', 11 );
接着就是设置网站的字体,将以下代码添加到style.css中:
/* 整体字体设置 */
body {
font-family:"Segoe UI","Microsoft YaHei","Hiragino Sans GB",STXihei,"Heiti SC",Roboto,"Droid Sans Fallback",Tahoma,Verdana,Arial,"Segoe UI Emoji",sans-serif;
font-size:100%;
font-style:inherit;
font-weight:inherit;
margin:0;
outline:0;
padding:0;
vertical-align:baseline;
}
body.custom-font-enabled {
font-family:"Segoe UI","Microsoft YaHei","Hiragino Sans GB",STXihei,"Heiti SC",Roboto,"Droid Sans Fallback",Tahoma,Verdana,Arial,"Segoe UI Emoji",sans-serif;
font-size:100%;
font-style:inherit;
font-weight:inherit;
margin:0;
outline:0;
padding:0;
vertical-align:baseline;
}
这里有三个注意点。
第一、font-family中的字体名要用英文,比如“微软雅黑”,我们就需要写成“Microsoft YaHei”,这是为了支持更多的浏览器版本和设备;
第二、字体不一定要和我的一样,你也可以根据自己喜欢选择其他字体,比如思源宋体等;第三、除了中文字体,也要有英文字体、特殊字体等,不然可能会出现显示问题。
网站页脚样式以及内容修改
此处需要用到footer.php和style.css这个文件,在第一部分修改中已经说到,直接复制父主题该文件到子主题即可,然后进行修改。
主要有两个方面:
第一是页脚内容修改,需要修改footer.php里的内容。因为wordpress默认的页脚内容是“proudly by wordpress”,很多人不想要带这个内容,那就改了,可以改成如“Copyright©2019-2021某某某某”这样的内容,这样别人可以看到建站时间以及版权所有。另外,如果你的网站进行了备案,建议把备案信息放在页脚,这也是国内互联网安全管理必要的。参考内容如下:
<p>
        Copyright © 2021-2023
<a href=""> Xie' Blog </a>|
<a href="/sitemap.html"> 网站地图 </a>|

        备案:<a href="网站备案链接" rel="external nofollow" target="_blank">这里填你的网站备案号</a> |
<a target="_blank" href="公网安备号链接" style="display:inline-block;text-decoration:none;height:20px;line-height:20px;">
        <img src="/wp-content/uploads/2019/07/beian.png" style="float:left;"/> 这里写公网安备号</a>
<br>虽然辛苦,我还是会选择那种滚烫的人生!任何反馈和建议,欢迎联系我。<br>
        我的微博:<a href="https://weibo.com/5214143450/profile?topnav=1&wvr=6" rel="external nofollow" target="_blank">Xie</a> | 公众号:xx
</p>第二是样式修改,放在style.css中,参考如下:
/* 页脚设置 */
footer[role="contentinfo"] {
margin: 24px 0 0 0;
text-align:  left;
max-width: 1190px;
max-width: 85rem;
font-size: 13px;
padding: 28px 0 28px 0;
}
简单解释下,margin是外边距,padding是内边距,它们之后有四个值,按顺序分别是——上、右、下、左——至于为什么是这个顺序,而不是上下左右,我们可以理解为顺时针更方面记忆。另外,如是一个值,则代表四个边距相同;如果是两个值,则是上、右,而下左缺省,代表下=上、左=右;如果是三个值,则是上、右、下,左缺省,代表左=右(我们可以理解为,一边缺省,代表它与对边的值相等)。其他的就是对字体大小、内容的对齐方式和整体宽度修改。需要注意“{}”不要忘记。
网页整体宽度修改(并修改背景颜色为白色)
因为我个人感觉twentytwelve主题的内容宽度有点窄,所以我就修改了一下,而且默认的背景颜色是淡灰色,也被我改成了白色,如此两边就不会显得太过空荡荡了。
这里需要修改两个地方:
一个是style.css,把以下内容加到style.css中即可:
/* 网页宽度 */
.site {
margin: 0 auto;
max-width: 1190px;
max-width: 85rem;
overflow: auto;
}
另一处修改需要在网站后台自定义中调整,路径为:“wordpress管理后台——外观——自定义——颜色——背景颜色——修改为纯白色即可”。这仅仅只是参考,如果你更喜欢原本的样式,可以不做修改。
网页头部和底部间距修改
这个比较简单,修改一下css,调整上下边距既可,代码如下:
/* 网页头部和底部间距 */
body .site {
margin-top: 0;
margin-bottom: 0;
}
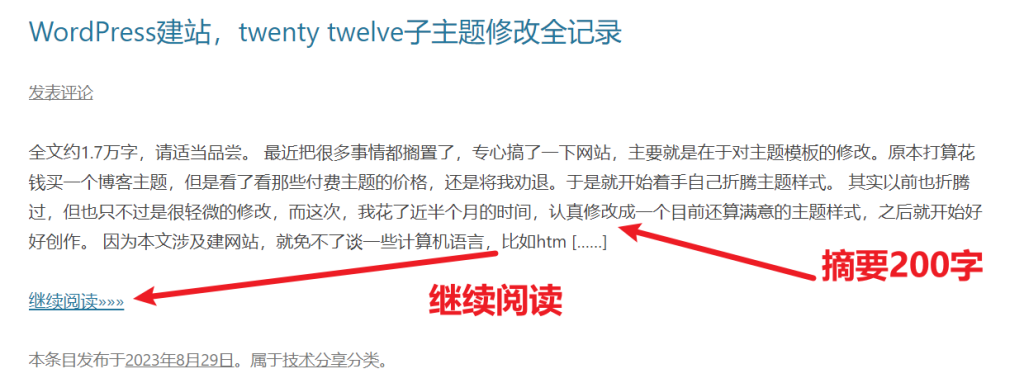
为首页等页面的文章添加摘要功能,设置摘要字数,并添加继续阅读
如果你没有在编辑文章时添加摘要的习惯,那么系统就会自动抓取预设的字数展示成摘要(当然是从正文的开头抓取),如果预设的达不到你的要求,就需要修改了。
另外,系统预设的没有“继续阅读”这四个字,只有“continue reading”,你也可以根据自己喜好改成中文。
要实现这些,将以下内容加入子主题的functions.php中即可:
//添加截取摘要汉字字数为200个
function custom_excerpt_length( $length ) {
return 200;
}
add_filter( 'excerpt_length', 'custom_excerpt_length', 999 );
//为摘要添加继续阅读字样
// Remove the ... from excerpt and change the text
function change_excerpt_more()
{
function new_excerpt_more($more)
{
// Use .read-more to style the link
return ' [......]<span class="read-more"> <a href="' . get_permalink($post->ID) . '"><br/><br/>继续阅读»»»</a></span>';
}
add_filter('excerpt_more', 'new_excerpt_more');
}
add_action('after_setup_theme', 'change_excerpt_more');接着打开content.php,找到这段代码:
<?php if ( is_search() ) : // Only display excerpts for search. ?>
<div class="entry-summary">
<?php the_excerpt(); ?>
</div><!-- .entry-summary -->
修改为:
<?php if ( is_search() || is_category() || is_archive() || is_home() ) : //Display Excerpts for Search category archive home ?>
<div class="entry-summary">
<?php the_excerpt(); ?>
</div><!-- .entry-summary -->
最终效果如图:

另外,你想要多少字,也可以修改,将functions.php代码内的“200”修改为其他数字即可,下面的“继续阅读”和“[……]”以及“》》》”也都是可以修改的。
去除网址中的分类标识
这一步只是为了网址看起来没那么长,如果不进行这一步,会在所有网址中加入category,导致网址很长,看起来不美观,而且它的存在没有任何意义。那么,删掉。将以下内容加入functions.php中即可:
//去除分类标志代码
add_action( 'load-themes.php',  'no_category_base_refresh_rules');
add_action('created_category', 'no_category_base_refresh_rules');
add_action('edited_category', 'no_category_base_refresh_rules');
add_action('delete_category', 'no_category_base_refresh_rules');
function no_category_base_refresh_rules() {
global $wp_rewrite;
    $wp_rewrite -> flush_rules();
}
add_action('init', 'no_category_base_permastruct');
function no_category_base_permastruct() {
global $wp_rewrite, $wp_version;
if (version_compare($wp_version, '3.4', '<')) {
// For pre-3.4 support
        $wp_rewrite -> extra_permastructs['category'][0] = '%category%';
    } else {
        $wp_rewrite -> extra_permastructs['category']['struct'] = '%category%';
    }
}
// Add our custom category rewrite rules
add_filter('category_rewrite_rules', 'no_category_base_rewrite_rules');
function no_category_base_rewrite_rules($category_rewrite) {
//var_dump($category_rewrite); // For Debugging
    $category_rewrite = array();
    $categories = get_categories(array('hide_empty' => false));
foreach ($categories as $category) {
        $category_nicename = $category -> slug;
if ($category -> parent == $category -> cat_ID)// recursive recursion
            $category -> parent = 0;
elseif ($category -> parent != 0)
            $category_nicename = get_category_parents($category -> parent, false, '/', true) . $category_nicename;
        $category_rewrite['(' . $category_nicename . ')/(?:feed/)?(feed|rdf|rss|rss2|atom)/?$'] = 'index.php?category_name=$matches[1]&feed=$matches[2]';
        $category_rewrite['(' . $category_nicename . ')/page/?([0-9]{1,})/?$'] = 'index.php?category_name=$matches[1]&paged=$matches[2]';
        $category_rewrite['(' . $category_nicename . ')/?$'] = 'index.php?category_name=$matches[1]';
    }
// Redirect support from Old Category Base
global $wp_rewrite;
    $old_category_base = get_option('category_base') ? get_option('category_base') : 'category';
    $old_category_base = trim($old_category_base, '/');
    $category_rewrite[$old_category_base . '/(.*)$'] = 'index.php?category_redirect=$matches[1]';
//var_dump($category_rewrite); // For Debugging
return $category_rewrite;
}
// Add 'category_redirect' query variable
add_filter('query_vars', 'no_category_base_query_vars');
function no_category_base_query_vars($public_query_vars) {
    $public_query_vars[] = 'category_redirect';
return $public_query_vars;
}
// Redirect if 'category_redirect' is set
add_filter('request', 'no_category_base_request');
function no_category_base_request($query_vars) {
//print_r($query_vars); // For Debugging
if (isset($query_vars['category_redirect'])) {
        $catlink = trailingslashit(get_option('home')) . user_trailingslashit($query_vars['category_redirect'], 'category');
        status_header(301);
        header("Location: $catlink");
exit();
    }
return $query_vars;
}
为什么那么长?一是应对不同的wordpress版本,二是为了应对一些debug。
修改文章模块间边框样式
默认情况下,twentytwelve主题首页的文章是没有边框的,文章与文章之间只有一条横线,这样看起来不太方便,于是我做了以下修改,将这些代码放在style.css中即可:
/* 修改首页文章模块间边框样式 */
.site-content article {
border: 1px solid #ededed;
padding: 24px;
margin-bottom: 24px;
overflow: auto;
}
border是边框的意思,如果指定方向,比如border-top就是上边框,之后的solid是实线的意思,#ededed是颜色代码。下边的overflow当元素溢出的处理方式。这些可以自行查看css文档,修改成自己想要的样式即可。
修改(新增)小工具模块间边框样式
这一点原理同上,不做过多赘述,直接放代码,也是放在style.css中:
/* 修改(新增)小工具模块间边框样式 */
.widget-area .widget {
border: 1px solid #ededed;
padding: 24px;
margin-bottom: 24px;
}
侧边栏小工具标题字体样式以及下横线
默认情况下,侧边栏小工具的标题是灰色,不太符合我网站的配色方案,于是做了修改,直接上代码,放在style.css中即可:
/* 小工具标题字体样式以及下横线 */
.widget-title {
font-size: 18px;
font-weight: normal;
color: #21759b;
border-bottom: 1px solid #ededed;
}
第9和第10对于侧边栏小工具修改后的样式如下:

首页文章标题行高以及下横线
直接上代码,放在style.css中即可:
/* 首页文章标题行高以及下横线 */
.entry-header .entry-title {
line-height: 2.181818182;
border-bottom: 1px solid #ededed;
}
第8和第11处修改后的综合效果如下:

网页头部空白处添加搜索框
默认情况下,网页右上角是一片空白,感觉空荡荡的,所以加个搜索框吧,虽然侧边栏小工具处可以添加搜索框,但并不好看。
需要两处修改:
第一处是header.php,在该php里找到</hgroup>,在它之后添加以下代码:
<div class="header-search"><?php get_search_form(); ?></div><!--网站头部添加搜索框-->第二处打开style.css,添加以下代码:
/* 头部添加搜索框 */
.header-search {
float: right;
margin-top: -50px;
}
@media (max-width: 650px) {
.header-search {
display: none;
}
}简单解释一下。这里有一个很巧妙的东西,就是@media(max-width:650px)这句,media是媒体的意思,max-width:650px是最大宽度650px,这句话的意思就是媒体设备的最大宽度为650px。为什么要加上这句?其实就是为了限制接下来的代码,在宽度650px以下的设备才会发挥效果。什么样的媒体设备最大宽度在650px以下呢?其实就是手机。整体意思就是,设定这个搜索框在手机端不显示。当然,你也可以根据自己喜好修改。
菜单导航样式修改并可支持svg小图标
这一步的修改就是修改一下导航栏,原本的样式虽然间接,但我并不太喜欢就修改了一下,并且改变了下拉菜单、字体等的样式,代码如下:
/* 只限于导航字体修改 */
.main-navigation .current_page_item > a {
font-size: 16px;
letter-spacing: 2px;
font-style: normal;
font-weight: 500;

}
/* 导航首页行高与外边距修改 */
.main-navigation li a {
line-height: 50px;
margin-left: 5px;
margin-right: 5px;
}
/* 导航其余菜单行高与外边距修改 */
.main-navigation li {
font-size: 16px;
letter-spacing: 2px;
font-style: normal;
font-weight: 400;
margin-left: 20px;
margin-right: 20px;
}
/* 导航下拉菜单字体与背景修改 */
.main-navigation li ul li a {
background: #76aac1;
border-bottom: 2px solid #fff;
font-size: 1rem;
width: 8rem;
color: #fff;
}
/* 导航下拉菜单外边距修改 */
.main-navigation li ul li {
margin-left: -10px;
margin-right: 0;
}
如果你想让这个样式只在电脑端显示,可以像上面那样加个@media的限制。如@media (min-width: 960px)——这里是设备最小宽度960px,一般的电脑设备都大于这个宽度。
再就是添加svg小图标了,需要在header.php添加以下代码,放在<head></head>之间即可:
<!-- font-awesome图标 -->
<link href="//netdna.bootstrapcdn.com/font-awesome/4.7.0/css/font-awesome.min.css" rel="stylesheet">
当然了,并没有结束,你还需要在后台添加上小图标,位置在:后台——外观——菜单——菜单结构——导航标签处,如图:
添加类似这样的代码:<i class="fa fa-home"></i>其中“fa-home”是图标的名称,可以修改,那么,这样的名称在哪里找呢?
打开这个网站:/,这其中有很多小图标,复制对应的名称修改即可。
最终效果如图:

添加分页导航功能并修改样式
这一步的修改挺难的,我找了好多都修改不成功,而twentytwelve主题本身的修改也是挺难的,不过最终还是让我找到了。
首先,我们打开index.php(记住复制父主题到子主题中修改),找到这句代码:<?php twentytwelve_content_nav( 'nav-below' ); ?>删掉它!这是程序本身自带的导航,太low了,然后我们在同样的位置添加以下代码:
<!--设置新的分页导航-->
<div class="posts-nav">
<ul>
<?php echo paginate_links(array(
'prev_next'          => 1,
'before_page_number' => '',
'mid_size'           => 2,
          ));?>
<ul>
</div>
<!--设置完毕-->这里解释一句,<!–设置新的分页导航–>这样的内容其实是对代码的备注,后续修改的时候,我们看一下代码就知道它是做什么的了,所以无论是修改代码还是写代码,都要养成“备注”的习惯,这样我们之后在维护的时候就简单多了。
接着再打开style.css,给分页导航添加个样式:
/* 分页导航样式 */.posts-nav {font-size:14px;color:rgba(0, 0, 0, 0.44);padding:10px 0;margin:0 auto;text-align:center;}.posts-nav .page-numbers {border-radius:3px;border:1px solid rgba(0, 0, 0, 0.15);display:inline-block;text-align:center;width:30px;line-height:30px;margin:0 5px;}.posts-nav .page-numbers.current, .posts-nav .page-numbers:not(.dots):hover {background:#3b5998;border-color:#3b5998;color:#fff;}.posts-nav .page-numbers.dots {border-color:rgba(0, 0, 0, 0);}a.prev.page-numbers, a.next.page-numbers {border-radius:3px;border:1px solid rgba(0, 0, 0, 0.15);display:inline-block;text-align:center;width:70px;line-height:30px;margin:0 5px;}代码很多,你可以试着慢慢修改调试,其中有个:hover,意思是当鼠标经过或覆盖在其上时的样式。
效果如下:

设置新标签页打开链接
关于这一点,我暂时也没找到更好的方式代替,只能用最简单粗暴的方式,设置了网站内所有链接在新标签页打开。
好处是可以实现新标签页打开链接了,坏处是所有的链接都要在新标签页打开了。
方法是,打开header.php,在<head>下添加以下代码:<base target="_blank">搞定!
新增面包屑导航
什么是面包屑导航呢?我看了下百科,没想到这个概念还来源于一个童话故事:面包屑导航这个概念来自童话故事“汉赛尔和格莱特”,当汉赛尔和格莱特穿过森林时,不小心迷路了,但是他们发现在沿途走过的地方都撒下了面包屑,让这些面包屑来帮助他们找到回家的路。所以,面包屑导航的作用是告诉访问者他们目前在网站中的位置以及如何返回。
接下来就添加一下吧。
首先打开functions.php,添加以下代码:
// 面包屑导航
function breadcrumb() {
// Check if is front/home page, return
if ( is_front_page() ) {
return;
  }
// Define
global $post;
  $custom_taxonomy  = ''; // If you have custom taxonomy place it here
  $defaults = array(
'seperator'   =>  ' / ',
'id'          =>  'breadcrumb',
'classes'     =>  'breadcrumb',
'home_title'  =>  esc_html__( '⚐ Home', '' )
  );
  $sep  = '<li class="seperator">'. esc_html( $defaults['seperator'] ) .'</li>';
// Start the breadcrumb with a link to your homepage
echo '<ul id="'. esc_attr( $defaults['id'] ) .'" class="'. esc_attr( $defaults['classes'] ) .'">';
// Creating home link
echo '<li class="item"><a href="'. get_home_url() .'">'. esc_html( $defaults['home_title'] ) .'</a></li>' . $sep;
if ( is_single() ) {
// Get posts type
    $post_type = get_post_type();
// If post type is not post
if( $post_type != 'post' ) {
      $post_type_object   = get_post_type_object( $post_type );
      $post_type_link     = get_post_type_archive_link( $post_type );
echo '<li class="item item-cat"><a href="'. $post_type_link .'">'. $post_type_object->labels->name .'</a></li>'. $sep;
    }
// Get categories
    $category = get_the_category( $post->ID );
// If category not empty
if( !empty( $category ) ) {
// Arrange category parent to child
      $category_values      = array_values( $category );
      $get_last_category    = end( $category_values );
// $get_last_category    = $category[count($category) - 1];
      $get_parent_category  = rtrim( get_category_parents( $get_last_category->term_id, true, ',' ), ',' );
      $cat_parent           = explode( ',', $get_parent_category );
// Store category in $display_category
      $display_category = '';
foreach( $cat_parent as $p ) {
        $display_category .=  '<li class="item item-cat">'. $p .'</li>' . $sep;
      }
    }
// If it's a custom post type within a custom taxonomy
    $taxonomy_exists = taxonomy_exists( $custom_taxonomy );
if( empty( $get_last_category ) && !empty( $custom_taxonomy ) && $taxonomy_exists ) {
      $taxonomy_terms = get_the_terms( $post->ID, $custom_taxonomy );
      $cat_id         = $taxonomy_terms[0]->term_id;
      $cat_link       = get_term_link($taxonomy_terms[0]->term_id, $custom_taxonomy);
      $cat_name       = $taxonomy_terms[0]->name;
    }
// Check if the post is in a category
if( !empty( $get_last_category ) ) {
echo $display_category;
echo '<li class="item item-current">'. get_the_title() .'</li>';
    } else if( !empty( $cat_id ) ) {
echo '<li class="item item-cat"><a href="'. $cat_link .'">'. $cat_name .'</a></li>' . $sep;
echo '<li class="item-current item">'. get_the_title() .'</li>';
    } else {
echo '<li class="item-current item">'. get_the_title() .'</li>';
    }
  } else if( is_archive() ) {
if( is_tax() ) {
// Get posts type
      $post_type = get_post_type();
// If post type is not post
if( $post_type != 'post' ) {
        $post_type_object   = get_post_type_object( $post_type );
        $post_type_link     = get_post_type_archive_link( $post_type );
echo '<li class="item item-cat item-custom-post-type-' . $post_type . '"><a href="' . $post_type_link . '">' . $post_type_object->labels->name . '</a></li>' . $sep;
      }
      $custom_tax_name = get_queried_object()->name;
echo '<li class="item item-current">'. $custom_tax_name .'</li>';
    } else if ( is_category() ) {
      $parent = get_queried_object()->category_parent;
if ( $parent !== 0 ) {
        $parent_category = get_category( $parent );
        $category_link   = get_category_link( $parent );
echo '<li class="item"><a href="'. esc_url( $category_link ) .'">'. $parent_category->name .'</a></li>' . $sep;
      }
echo '<li class="item item-current">'. single_cat_title( '', false ) .'</li>';
    } else if ( is_tag() ) {
// Get tag information
      $term_id        = get_query_var('tag_id');
      $taxonomy       = 'post_tag';
      $args           = 'include=' . $term_id;
      $terms          = get_terms( $taxonomy, $args );
      $get_term_name  = $terms[0]->name;
// Display the tag name
echo '<li class="item-current item">'. $get_term_name .'</li>';
    } else if( is_day() ) {
// Day archive
// Year link
echo '<li class="item-year item"><a href="'. get_year_link( get_the_time('Y') ) .'">'. get_the_time('Y') . '年</a></li>' . $sep;
// Month link
echo '<li class="item-month item"><a href="'. get_month_link( get_the_time('Y'), get_the_time('m') ) .'">'. get_the_time('M') .'</a></li>' . $sep;
// Day display
echo '<li class="item-current item">'. get_the_time('jS') .' '. get_the_time('M'). '</li>';
    } else if( is_month() ) {
// Month archive
// Year link
echo '<li class="item-year item"><a href="'. get_year_link( get_the_time('Y') ) .'">'. get_the_time('Y') . '年</a></li>' . $sep;
// Month Display
echo '<li class="item-month item-current item">'. get_the_time('M') .'</li>';
    } else if ( is_year() ) {
// Year Display
echo '<li class="item-year item-current item">'. get_the_time('Y') .'年</li>';
    } else if ( is_author() ) {
// Auhor archive
// Get the author information
global $author;
      $userdata = get_userdata( $author );
// Display author name
echo '<li class="item-current item">'. 'Author: '. $userdata->display_name . '</li>';
    } else {
echo '<li class="item item-current">'. post_type_archive_title() .'</li>';
    }
  } else if ( is_page() ) {
// Standard page
if( $post->post_parent ) {
// If child page, get parents
      $anc = get_post_ancestors( $post->ID );
// Get parents in the right order
      $anc = array_reverse( $anc );
// Parent page loop
if ( !isset( $parents ) ) $parents = null;
foreach ( $anc as $ancestor ) {
        $parents .= '<li class="item-parent item"><a href="'. get_permalink( $ancestor ) .'">'. get_the_title( $ancestor ) .'</a></li>' . $sep;
      }
// Display parent pages
echo $parents;
// Current page
echo '<li class="item-current item">'. get_the_title() .'</li>';
    } else {
// Just display current page if not parents
echo '<li class="item-current item">'. get_the_title() .'</li>';
    }
  } else if ( is_search() ) {
// Search results page
echo '<li class="item-current item">Search results for: '. get_search_query() .'</li>';
  } else if ( is_404() ) {
// 404 page
echo '<li class="item-current item">' . 'Error 404' . '</li>';
  }
// End breadcrumb
echo '</ul>';
}
接着打开header.php,在结尾添加以下代码:
<?php
// 文章页面添加面包屑导航
if ( function_exists('breadcrumb') ) breadcrumb();
?>
最后修改样式,打开style.css,添加以下代码:
/* 面包屑导航样式 */
.breadcrumb {
font-size: 12px;
color: #888;
margin:0 auto;
}
.breadcrumb a {
color: #888;
}
.breadcrumb a:not(.dots):hover {
color: #CC0033;
}
.breadcrumb li {
display: inline;
line-height:20px;
}
搞定!最终的效果如图:

PS:由此可以得出一个人生道理,虽然你想得到的是很简单的东西(仅仅这一行内容),但也要付出很大的努力(写了很多代码)。
标签云样式修改
也不做过多的解释了,直接上代码,打开style.css,将以下代码加入即可:
/* 标签云样式修改 */
.tagcloud {
overflow:hidden;
line-height:20px;
}
.tagcloud a {
font-size: 13px!important;
border:1px solid rgba(0, 0, 0, 0.3);
padding:5px;
margin-right:5px;
margin-bottom:4px;
float:left;
display:block;
}
.tagcloud a:not(.dots):hover {
background-color: #336699;
color: #FFFFFF;
border:0;
}
具体样式,根据自己喜好修改即可,效果如图:

新增返回顶部按钮
一个小按钮,可以让你从底部直接到顶部,尤其是对于长篇内容,就比如这篇,这样的按钮的确太重要了。
关于这个返回按钮,我也找了很多版本测试,最终找到了可行的办法。可能你会觉得,需要添加在functions.php中,这次竟然出乎意料的不需要它了。
首先打开footer.php(你没看错),在适当的地方添加以下代码:
<!-- 返回顶部 -->
<div style="display: none;" id="gotop"></div>
<script type='text/javascript'> backTop=function (btnId){ var btn=document.getElementById(btnId); var d=document.documentElement; var b=document.body; window.onscroll=set; btn.onclick=function (){ btn.style.display="none"; window.onscroll=null; this.timer=setInterval(function(){ d.scrollTop-=Math.ceil((d.scrollTop+b.scrollTop)*0.1); b.scrollTop-=Math.ceil((d.scrollTop+b.scrollTop)*0.1); if((d.scrollTop+b.scrollTop)==0) clearInterval(btn.timer,window.onscroll=set); },10); }; function set(){btn.style.display=(d.scrollTop+b.scrollTop>300)?'block':"none"} }; backTop('gotop');
</script>
<!-- 返回顶部END -->
我选择了添加在<footer>标签之下。
接着打开style.css,添加以下代码:
/* 返回顶部 */
@media (min-width: 960px) {
#gotop{
width:40px;
height:40px;
position:fixed;
bottom:130px;
right:30px;
top:auto;
display:block;
cursor:pointer;
background: url(images/top.svg) no-repeat center center;
}
*html #gotop{
position:absolute;
bottom:auto;
top:expression(eval(document.documentElement.scrollTop+document.documentElement.clientHeight-this.offsetHeight-(parseInt(this.currentStyle.marginTop,10)||0)-(parseInt(this.currentStyle.marginBottom,10)||0)));
}
}
这里我设置了只在电脑端显示。其中,图片的路径很重要,我的方法是在子主题内新建一个images文件夹,在这个文件夹中放一个top.svg的图标,就是上面的路径,这个图标可以自行找一个。
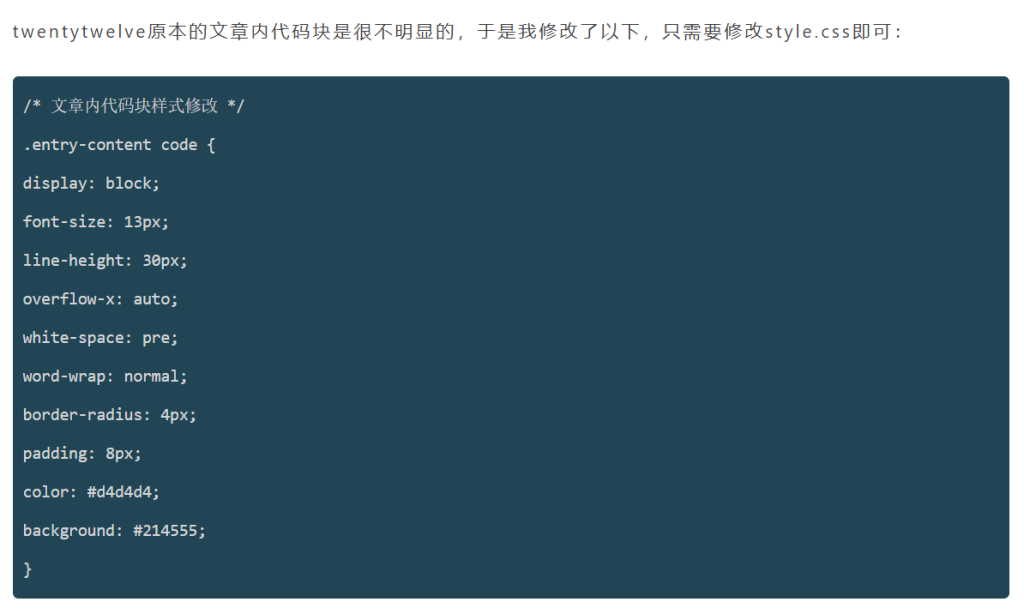
文章内代码部分样式修改(实现代码高亮)
twentytwelve原本的文章内代码块是很不明显的,于是我修改了以下,只需要修改style.css即可:
/* 文章内代码块样式修改 */
.entry-content code {
display: block;
font-size: 13px;
line-height: 30px;
overflow-x: auto;
white-space: pre;
word-wrap: normal;
border-radius: 4px;
padding: 8px;
color: #d4d4d4;
background: #214555;
}
效果如图(其中的颜色等样式可自行修改):

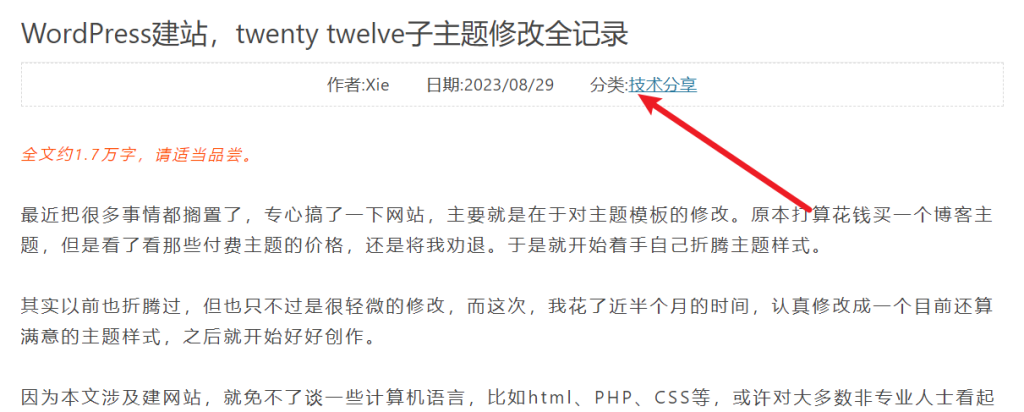
首页和内容页的内容标题下、文章脚部添加描述元素(作者、发布时间、标签、分类等)并编辑样式
这个分为两部分:首页元素和内容页元素。
第一部分:首页元素。首页的地方,我删除了标题下的“回复”,并在摘要下方添加了“时间、作者、分类、标签”的描述元素。
第二部分:内容页元素。在内容页的文章标题下,增加了“作者、时间、分类”的描述,并在文章脚部新增了“标签”描述。
这一步太过繁琐,我就把整个代码全部贴上,你可以自行研究下。
①首先打开content.php,找到以下代码:
<?php if ( is_single() ) : ?>
<h1 class="entry-title"><?php the_title(); ?></h1>
<?php else : ?>
在<?php else: ?>的上面添加以下代码:
<p class="meta"><!--文章页标题下标签-->
Auth:<?php the_author_nickname(); ?>      
Date:<?php echo the_time('Y/m/j'); ?>      
Cat:<?php the_category('、'); ?>
</p>②接着往下找到这段代码:
<?php if ( comments_open() ) : ?>
<div class="comments-link">
<?php comments_popup_link( '<span class="leave-reply">' . __( 'Leave a reply', 'twentytwelve' ) . '</span>', __( '1 Reply', 'twentytwelve' ), __( '% Replies', 'twentytwelve' ) ); ?>
</div><!-- .comments-link -->
<?php endif; // comments_open() ?>
这段代码是首页文章标题下的回复链接,如果不想要,删掉即可。
③还是content.php,再继续往下,找到<footer></footer>,将这两个标签内(包括这两个标签)的所有内容删除,并替换为以下代码:
<?php if ( is_single() ) : ?>
<footer class="content-foot"><!--文章页脚部显示修改-->
<?php the_tags('⚑Tags:','、'); ?>      
</footer><!-- .content-foot -->
<?php else : ?>
<footer class="home-foot"><!--除文章页脚部显示修改-->
◷<?php echo the_time('Y/m/j'); ?>  
@<?php the_author_nickname(); ?>  
▤<?php the_category('、'); ?>  
⚑<?php the_tags('','、'); ?>
<?php edit_post_link( __( '——编辑', 'twentytwelve-child' ), '<span class="edit-link">', '</span>' ); ?>
</footer><!-- .entry-meta -->
<?php endif; // is_single() ?>简单解释一下,<?php if ( is_single() ) : ?>这句是条件判定,意思是“如果是文章页面”,则会继续以下的判定;<?php else : ?>就是“否则”的意思,否则进行以下判定。我用这样的方式,来分别为首页文章脚部和文章页文章脚部做不同的修改。
④打开style.css,添加以下代码:
/* 文章页标题、meta块、和脚部样式修改 */
#content .title {
font-size: 24px;
padding-bottom: 24px;
text-align: center;
}
#content .meta {
font-size: 13px;
padding: 10px 0 10px 0;
border: 1px dashed rgba(0, 0, 0, 0.15);
text-align: center;
letter-spacing: 0.035rem;
}
#content .content-foot {
font-size: 13px;
padding: 10px 0 10px 24px;
margin: 0 -24px -24px -24px;
letter-spacing: 0.035rem;
background-color: #ededed;
}
/* 首页文章meta标签样式 */
#content .home-foot {
margin-top: 24px;
margin-top: 1.714285714rem;
font-size: 13px;
font-size: 0.928571429rem;
line-height: 1.846153846;
color: #757575;
}
以上就是这两部分的完全修改,上效果:
首页文章脚部——

文章页标题下——

文章页脚部标签——

站点标题和副标题处变为logo图片(原为文字)
twentytwelve主题的站点标题和副标题处原为文字,但我想更加简单一些,于是就换成了一个图片。
打开header.php,找到这段代码:
<hgroup>
<h1 class="site-title"><a href="<?php echo esc_url( home_url( '/' ) ); ?>" title="<?php echo esc_attr( get_bloginfo( 'name', 'display' ) ); ?>" rel="home"><?php bloginfo( 'name' ); ?></a></h1>
<h2 class="site-description"><?php bloginfo( 'description' ); ?></h2>
</hgroup>
修改为图片的代码:
<hgroup>
<h1 class="site-title">
<a href="" title="冰哥笔记" rel="home">
<img src="/wp-content/uploads/2021/04/headerlogo.png" alt="冰哥笔记" width="200" height="70" />
</a><!--站点标题和副标题变为图片logo-->
</hgroup>
图片自己设计,图片要先上传到wordpress后台,然后复制图片链接即可。
后台新增友链设置并设置样式
做博客,就免不了友链,这也是提高博客知名度和权重的一种方式,wordpress其实自带了友链,只不过没有用代码调用,需要我们自行调用激活。
打开functions.php,添加以下代码:
//调取友链
add_filter('pre_option_link_manager_enabled','__return_true');
//只显示在首页
function bgbj_friend_links($output){
if (!is_home()|| is_paged()){
    $output = "";
  }
return $output;
}
add_filter('wp_list_bookmarks','bgbj_friend_links');
再打开后台,就会多了一个“链接”的目录,如图:

之后友链都在这里添加,当然,你还需要在侧边栏小工具中将链接添加到侧边栏才能显示。
接着打开style.css,修改一下样式,添加以下代码即可:
/* 友链样式(分两栏) */
.blogroll{
display: block;
overflow: auto;
zoom: 1;
}
.blogroll li{
float: left;
width: 50%;
display: block;
}
效果如图:

自定义aboutme和侧边栏小工具
每一个网站或博客,都需要一个关于网站或关于博客或关于我的介绍,这也能让别人更加了解网站或你。而wordpress是一个可以完全自定义的平台,这也是我选择它的原因之一。那么,我们就可以自定义一个aboutme。
首先,在子主题下新建一个xxx-page.php文件,前面的内容可自定,比如我新建的就是bg-page.php,之后用代码编辑软件打开它,加入以下内容:
<?php
/**
 * Template Name: 自定义页面模板
 */
?>
那么你在后台新建页面时,就可以看到这个模板了。
当然了,我们还需要调取一些内容,比如和首页一样的页头,我们可以稍微修改一下上述代码:
<?php
/**
 * Template Name: 自定义页面模板
 */
get_header();?>
这样,头部模板就被调用过来了。
如果你还想调取其他东西,比如页脚部分,我们可以在之后加入以下代码:<?php get_footer(); ?>现在再打开刷新一下,页脚也出现了。
接下来你还可以调取其他内容,比如侧边栏、内容等等,只需使用相应的调取函数即可。
但是,毕竟是自定义的介绍我或网站的页面,当然要和其他页面有所不同,我们可以只调取头部、页脚、内容、评论和自定义侧边栏,整体代码可以是这样的:
<?php
/**
 * Template Name: BG Page Template
 *
 * Description: A page template that provides a key component of WordPress as a CMS
 * by meeting the need for a carefully crafted introductory page. The BG page template
 * in Twenty Twelve consists of a page content area for adding text, images, video --
 * anything you'd like -- followed by bg-page-only widgets in one or two columns.
 *
 * @package WordPress
 * @subpackage Twenty_Twelve
 * @since Twenty Twelve 1.0
 */

get_header(); ?>

<div id="primary" class="site-content">
<div id="content" role="main">

<?php
while ( have_posts() ) :
        the_post();
?>
<?php get_template_part( 'content', 'page' ); ?>
<?php comments_template( '', true ); ?>
<?php endwhile; // End of the loop. ?>

</div><!-- #content -->
</div><!-- #primary -->

<?php get_sidebar( 'front' ); ?>
<?php get_footer(); ?>
这里仅仅做一个参考,你可以根据需要自行修改。
接着主要说一下自定义侧边栏。其实啊,twentytwelve主题自带了两种侧边栏,一种是首页侧边栏,另一种是静态页面下的侧边栏,而我们默认使用的是第一种首页侧边栏。
但如果还是调用首页侧边栏,自定义页面的侧边栏也会和首页的一样,这,满足不了我们,那么我们就将另一种静态页面下的侧边栏喊醒,调用它,来实现不同页面不同侧边栏。
其实,只需一段代码,平时调用侧边栏的代码是:<?php get_sidebar(); ?>
这次我们来改一下,改为:<?php get_sidebar( 'front' ); ?>这就可以调用第二种侧边栏了(其实第二种侧边栏的文件就在父主题中,名字叫sidebar-front.php)。
在所有文章底部新增自定义固定内容(如打赏、内容版权等固定内容)
这一步可以分为两个部分,一部分是在所有文章底部新增自定义固定内容区域,一部分是打赏。
先是自定义固定内容区域,打开functions.php,添加以下代码即可:
//在所有文章底部添加自定义内容
function bgbj_add_after_post_content($content) {
  if(!is_feed() && !is_home() && is_singular('post') && is_main_query()) {
    $content .= '
     这个区域可以随便写内容
    ';
  }
  return $content;
}
add_filter('the_content', 'bgbj_add_after_post_content', 99, 1);
这个固定内容常用于添加文章版权、作者介绍、赞赏等。
我就添加了一个赞赏的功能,其实很简单,就是加了一张图片,将自己的收款二维码放进去即可。
我完整的代码如下:
//在所有文章底部添加自定义内容
function bgbj_add_after_post_content($content) {
  if(!is_feed() && !is_home() && is_singular('post') && is_main_query()) {
    $content .= '
<br/><br/>
<div style="text-align: center; letter-spacing: 1px;">
<strong><span style="font-size: 24px;color: #333333;">Thank you.</span></strong><br/>
<span style="color: #565656;">If you like my content, please let me know : )</span><br/><br/>
<i class="fa fa-angle-down" aria-hidden="true"></i><br/>
<i class="fa fa-angle-down" aria-hidden="true"></i><br/>
<i class="fa fa-angle-down" aria-hidden="true"></i>
</div><br/>
<div style="text-align: center; border-top: 1px solid #ededed;">
<br/><br/>
<div>
<strong>用 <span style="color: #339966;">微信</span> OR <span style="color: #337fe5;">支付宝</span> 扫描二维码</strong>
</div>
<div>
<strong>为作者 <span style="color: #ff6600;">打个赏</span></strong>
</div>
<br/>
<div>
<img class="wp-image-558 size-thumbnail" src="/wp-content/uploads/2021/04/shoukuan.png" alt="pay" width="500" height="278" />
</div>
<div>
<span style="color: #999999;letter-spacing:2px;">金额随意 感谢支持</span>
</div>
<br/><br/>
</div>
    ';
  }
  return $content;
}
add_filter('the_content', 'bgbj_add_after_post_content', 99, 1);
效果如图:
添加图片灯箱效果(点击图片可放大)
twentytwelve父主题默认不带这个功能,只能在图片上右键在其他页面打开,于是我就添加了一个点击图片可放大的功能。
①首先,在functions.php中添加以下代码:
/**图片灯箱效果(点击放大)**/
add_filter('the_content', 'fancybox');
function fancybox($content){
$pattern = array("/<img(.*?)src=('|")([^>]*).(bmp|gif|jpeg|jpg|png|swf)('|")(.*?)>/i","/<a(.*?)href=('|")([^>]*).(bmp|gif|jpeg|jpg|png|swf)('|")(.*?)>(.*?)</a>/i");
$replacement = array('<a$1href=$2$3.$4$5 data-fancybox="gallery"><img$1src=$2$3.$4$5$6></a>','<a$1href=$2$3.$4$5 data-fancybox="images"$6>$7</a>');
$content = preg_replace($pattern, $replacement, $content);
    return $content;
}
②接着打开header.php在<head></head>之间添加以下代码:
<!-- 图片灯箱放大 -->
<link rel="stylesheet" href="/gh/fancyapps/fancybox@3.5.7/dist/jquery.fancybox.min.css" />
③再打开footer.php,在<footer>标签下添加以下代码:
<!-- 图片灯箱放大 -->
<script src="/gh/fancyapps/fancybox@3.5.7/dist/jquery.fancybox.min.js"></script>
图片灯箱的效果就实现了,效果如图:

单篇文章结束后的上一篇和下一篇样式修改
这个比较简单,首先打开single.php,找到以下内容:<nav class="nav-single">
将它之下的内容稍作修改,整体修改为(其实也就增加了“上一篇”和“下一篇”的字样):
<nav class="nav-single">
<h3 class="assistive-text"><?php _e( 'Post navigation', 'twentytwelve' ); ?></h3>
<span class="nav-previous"><?php previous_post_link( '%link', '<span class="meta-nav">' . _x( '←', 'Previous post link', 'twentytwelve' ) . '</span>上一篇:%title' ); ?></span>
<span class="nav-next"><?php next_post_link( '%link', '下一篇:%title <span class="meta-nav">' . _x( '→', 'Next post link', 'twentytwelve' ) . '</span>' ); ?></span>
</nav><!-- .nav-single -->接着打开style.css,添加以下代码:
/* 单篇文章页文章下的“上一篇和下一篇”样式修改 */
.site-content nav {
padding: 16px;
background-color: #ededed;
}
禁用自动保存
自动保存有时是好事,但有时也是坏事,就像在wordpress中,每自动保存一次,就会在数据库中增加一条无用的数据,久而久之,数据库就会被垃圾堆满。所以,必须禁用。
方法也很简单,打开functions.php,添加以下代码即可:
//禁用自动保存
function no_autosave() {
wp_deregister_script('autosave');
}
add_action( 'wp_print_scripts', 'no_autosave' );
禁用所有文章类型的修订版本
这个原理和上面的类似,每编辑一次文章,数据库就会记录一次,这也会给数据库增加很大负担。所以,禁用!
打开functions.php,添加以下代码即可:
//禁用所有文章类型的修订版本
add_filter( 'wp_revisions_to_keep', 'bgbj_wp_revisions_to_keep', 10, 2 );
function bgbj_wp_revisions_to_keep( $num, $post ) { return 0;}
发布、更新或删除日志后刷新首页
假如你发布了一篇文章,如果你想要让他立刻显示到首页,并让别人能看得到,就需要刷新,更新和删除同理,同样在functions.php下添加以下代码:
add_action('publish_post', 'refresh_front_page', 0); //发布或者更新日志时候刷新首页
add_action('delete_post', 'refresh_front_page', 0); //删除日志时候刷新首页
隐藏版本号
隐藏版本号是为了安全考虑,虽然我也不太明白它到底会导致什么结果,但为了网站的安全考虑,加上一段代码来隐藏版本号,也的确是很简单的一件事,同样在functions.php之下添加以下代码:
//隐藏版本号
function wpbeginner_remove_version() {
return '';
}
add_filter('the_generator', 'wpbeginner_remove_version');
头像设置
wordorpess的头像是很让人头痛的一件事,因为它默认调用的是Gravetar头像,但该网站在国内是不能使用的,这就会拖累网站速度。
今天我在网上找到了一个方法,就是调用CDN加速平台上的的头像,在functions.php中添加以下代码即可:
// 头像设置
function get_ssl_avatar($avatar) {
   $avatar = preg_replace('/.*/avatar/(.*)?s=([d]+)&.*/','<img src="/avatar/" class="avatar avatar-$2" height="44" width="44">',$avatar);
return $avatar;
}
add_filter('get_avatar', 'get_ssl_avatar');
另外,图片地址是别人七牛云上的图片地址,你也可以自己设置七牛云,而且有免费的空间,是很不错的一种选择。
于是,你的后台就可以看到头像了(但所有的头像都只能是默认的一个)。
最后说一些小提醒:
1、修改主题的难点在于找到它的位置,比如要修改某段文字的样式,你就需要找到它属于谁,推荐用火狐浏览器,按F12调出开发者工具,配合使用,这样可以帮助你更快地找到位置所在,之后再根据父主题的样式,在子主题做相应的修改;
2、请一定不要把任何分类、目录的别名命名为“ad”——意思为广告,倘若你或浏览者的浏览器安装了屏蔽广告的插件,那么打开的相应页面将会是空白,这也会把你吓一跳的;
3、如果你修改了样式没有任何反应,可能有以下几种情况:第一、样式头不对,比如是页脚的内容,应该以footer作为样式头,而你写了.header,那肯定不会有反应;第二、未删除缓存,安装了缓存插件,就会定时删除缓存,如果你需要及时看到样式的修改,就需要手动删除缓存;第三、父主题没有更改为子主题,如果你找到的样式里带有“TEMPLATEPATH”,请一定记得改为“STYLESHEETPATH”,前者是作用父主题的样式,后者才是作用子主题的样式;第四、我们也要容忍wordpress后台和数据库的迟钝,有时,即便你上述都没有任何问题,样式还是没有发生变化,那就是后台和数据库打了瞌睡,等一等,再等一等就好。4、在做修改之前,请记得做好备份,如果修改的不满意,或者出了一些问题,也可以及时恢复。另外,我强烈建议大家用本地搭建的方式来修改调试,这可以避免很多不必要的损失。
最后,感谢各位wordpress爱好者的智慧,因为有了你们,我才能做出如此修改。
本文撰写时间:2021年4月21日当前版本:5.7.1
end
作者:冰冰
这篇内容很熟悉啊,冰哥笔记里就有一篇一模一样的,你复制人家的教程好歹提一句吧。
另外,Bug还是有不少的。
是的,文末有写作者,他的博客已经打不开了,所以我又完整复制了一份
还不如使用我修改的这个 https://github.com/huhexian/2012-huhexian/
大佬,刚换Wordpress才不久,不太熟悉这个博客程序。你怎么知道我这个网站的呢,你也很快就回复了,评论是会有通知吗?
没有通知。我在统计网站上看到了来源网站。